How to deploy your ML models quickly with this API-building tool.

Knowing how to integrate machine learning models into usable applications is an important skill for data scientists. In my previous article linked below, I demonstrated how you can quickly and easily build web apps to showcase your models with Streamlit.
https://towardsdatascience.com/how-you-can-quickly-build-ml-web-apps-with-streamlit-62f423503305
However, what if you want to integrate your machine learning model into a larger software solution instead of a simple standalone web application? What if you are working alongside a software engineer who is building a large application and needs to access your model through a REST API? This exactly where FastAPI comes into play.
FastAPI is a Python web framework that makes it easy for developers to build fast (high-performance), production-ready REST APIs. If you’re a data scientist who works mostly with Python, FastAPI is an excellent tool for deploying your models as REST APIs. In this article, I will demonstrate how you can deploy a spam detection model by building a REST API with FastAPI and running the API in a Docker container.
Training a Spam Detection Model
In this section, I will train a simple spam classification model that determines if a text message is spam. I reused the model training code from my previous article about building web apps with Streamlit so I have included the code below with minimal comments.
I used this Spam Classification Dataset from Kaggle to train a neural network for spam classification. The original dataset is available here as the SMS Spam Collection. You can find the full code for this tutorial on GitHub.
https://gist.github.com/AmolMavuduru/3ec8c42c5ec572380c78761c764215d9
The code above performs the following steps:
- Reads the spam dataset.
- Splits the spam dataset into training and testing sets.
- Creates a text preprocessing and deep learning pipeline for spam classification.
- Trains the model pipeline on the training set.
- Evaluates the model pipeline on the testing set.
- Saves the trained model pipeline.
Building the FastAPI App
In this section, I will demonstrate how to take the trained spam detection model and deploy it as a REST API with FastAPI. The code will be written incrementally in a file called main.py that will run the FastAPI app. Please refer to the following Github repo for the complete code.
Import Libraries
In the code below, I imported the necessary libraries for loading the spam detection model and building the FastAPI app.
import joblib
import re
from sklearn.neural_network import MLPClassifier
from sklearn.feature_extraction.text import TfidfVectorizer
from fastapi import FastAPI
Initializing a FastAPI App Instance
With just one line of code, we can initialize a FastAPI instance as shown below.
app = FastAPI()
This app object is responsible for handling the requests for our REST API for different URIs.
Defining a Simple GET Request
Now that we have a FastAPI app object, we can use it to define the output for a simple get request as demonstrated below.
@app.get('/')
def get_root():
return {'message': 'Welcome to the spam detection API'}
The get request above for the root URL simply returns a JSON output with a welcome message. We can run the FastAPI app using the following command.
uvicorn main:app --reload
The command starts a local Uvicorn server and you should see an output similar to the output shown in the screenshot below.

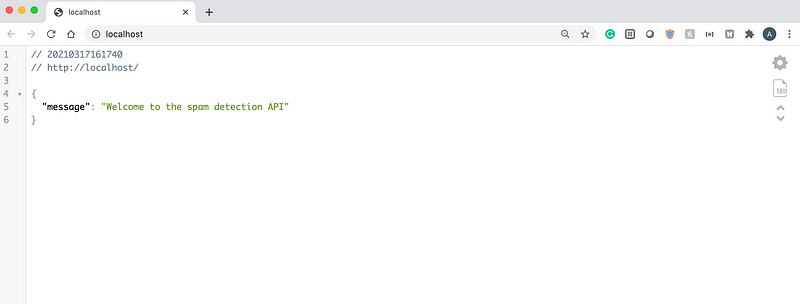
If you go to the localhost URL http://127.0.0.1.8000 in your browser, you should see a JSON message output as demonstrated below.
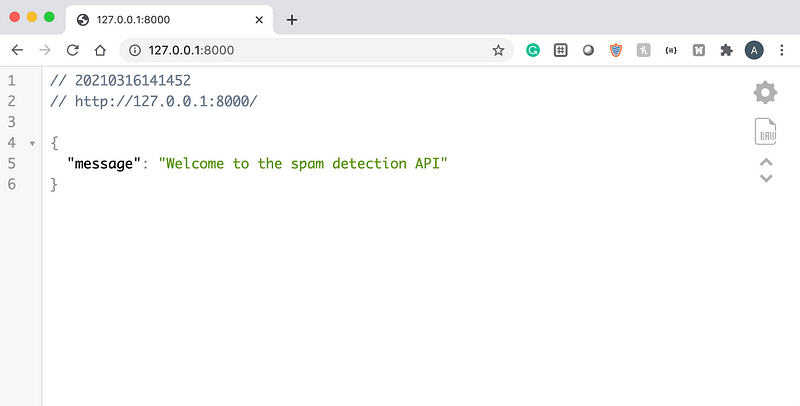
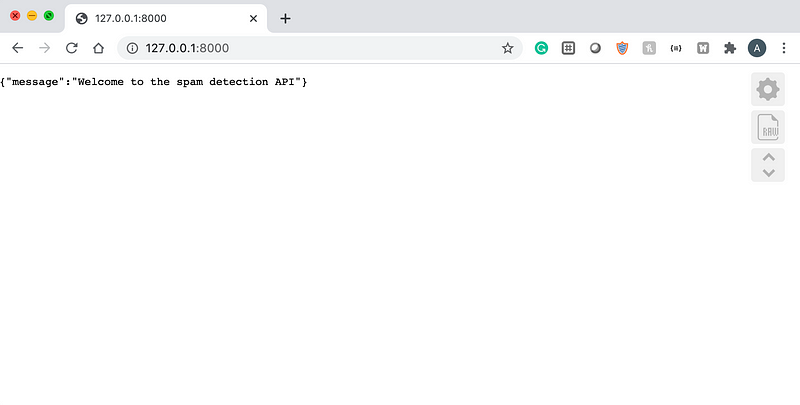
I have the JSON Viewer Chrome extension installed, which is why I can see the neat output above, if you don’t have this extension installed, the output in your browser will look more like this.
Now that we know how to define a simple GET request with FastAPI, we can define GET requests to retrieve the spam detection model’s predictions.
Loading the Model and Defining Helper Functions
Before defining the GET request that invokes the spam detection model, we need to first load the model and define functions for preprocessing the text data and returning the model’s predictions.
model = joblib.load('spam_classifier.joblib')
def preprocessor(text):
    text = re.sub('<[^>]*>', '', text) # Effectively removes HTML markup tags
    emoticons = re.findall('(?::|;|=)(?:-)?(?:\)|\(|D|P)', text)
    text = re.sub('[\W]+', ' ', text.lower()) + ' '.join(emoticons).replace('-', '')
    return text
def classify_message(model, message):
    message = preprocessor(message)
    label = model.predict([message])[0]
    spam_prob = model.predict_proba([message])
return {'label': label, 'spam_probability': spam_prob[0][1]}
The preprocessor function above removes emoticons and unwanted characters from the text input while the classify_message function calls the preprocessor function to clean a text message before using the spam detection model to generate predictions. The classify_message function returns a dictionary, which can conveniently be interpreted as a JSON response.
Defining the Spam Detection GET Request
FastAPI makes it really easy to supply and read variables for GET requests. You can supply the inputs of a machine learning model to a GET request using query parameters or path variables.
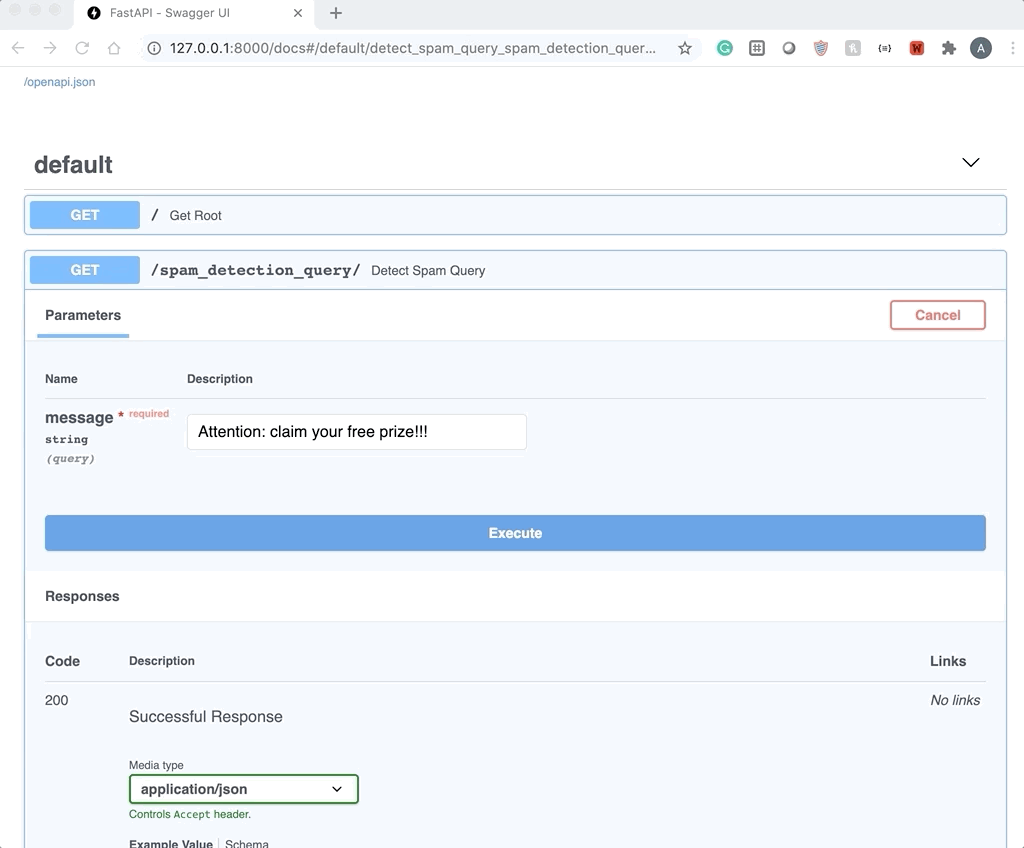
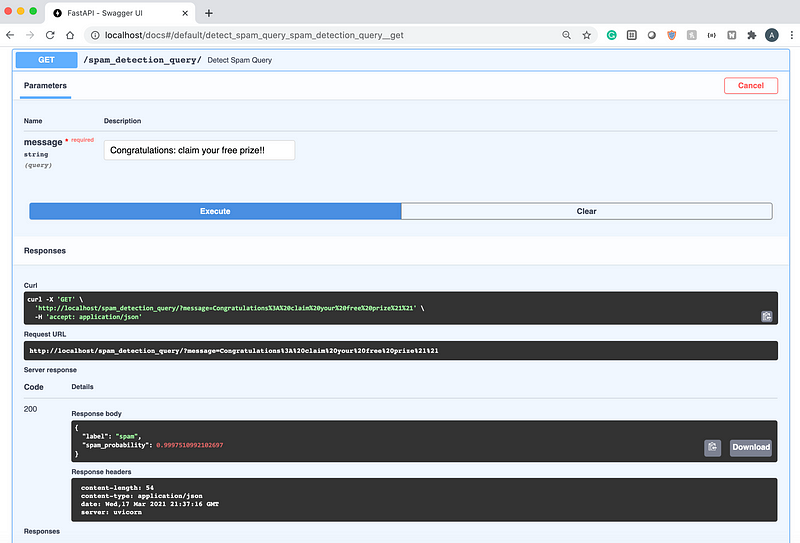
Using Query Parameters
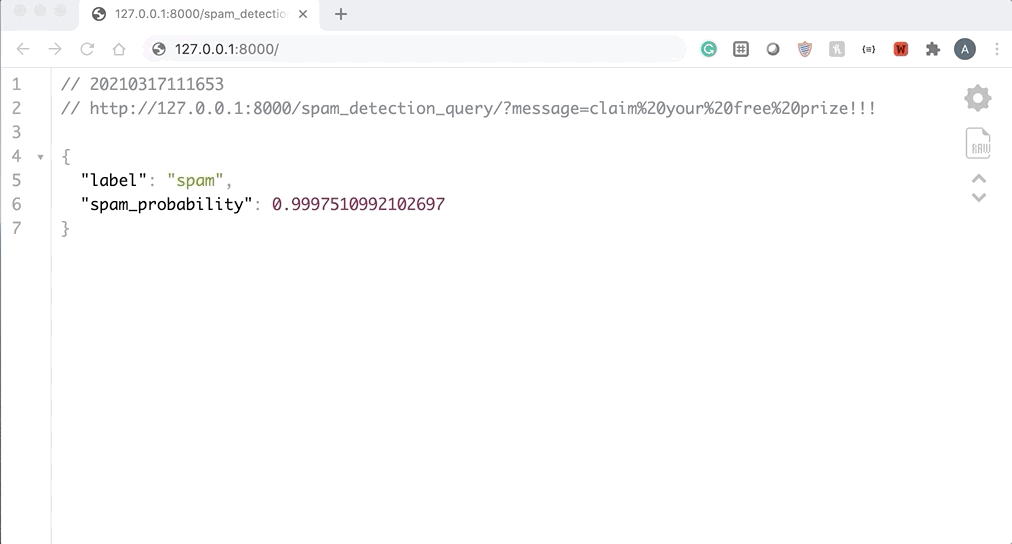
For a REST API, query parameters are part of the URL string and are prefixed by a “?”. For example, for the spam detection API we are creating, a GET request could look like this:
127.0.0.1.8000/spam_detection_query/?message=’hello, please reply to this message’
Notice how the message argument at the end is a query parameter. We can write a function that accepts a message as a query parameter and classifies it as ham or spam as demonstrated below.
@app.get('/spam_detection_query/')
async def detect_spam_query(message: str):
return classify_message(model, message)
If we navigate to the localhost URL, we can test this code with a sample message.
Using Path Variables
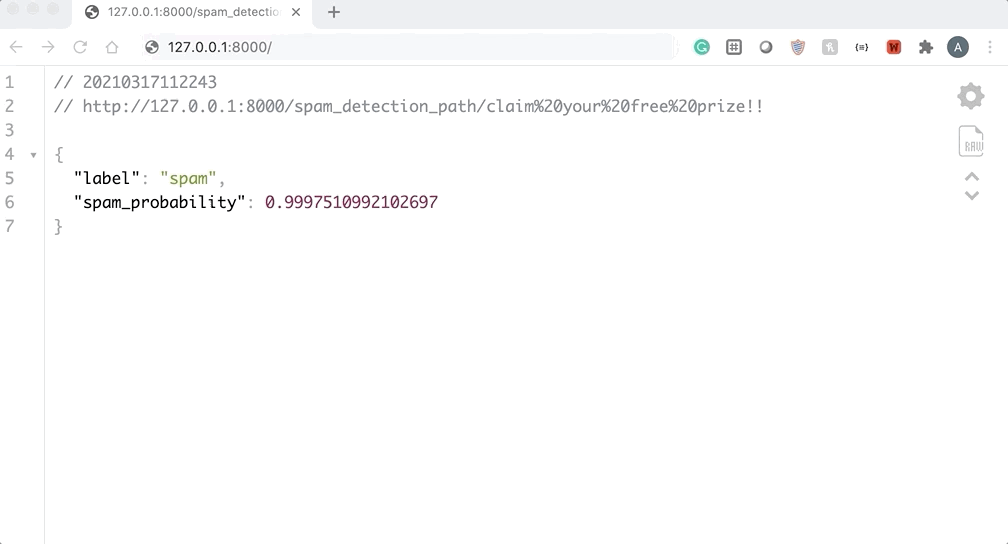
When using path variables, the input data is passed to the API as a path in the URL. In this case, a GET request could look like this:
127.0.0.1.8000/spam_detection_query/hello, please reply to this message
Notice how the message is just a part of the URL path and we didn’t have to use any query parameters. We can write a GET request that accepts the message in this format as demonstrated below.
@app.get('/spam_detection_path/{message}')
async def detect_spam_path(message: str):
return classify_message(model, message)
We can test this new GET request by navigating to the API URL from localhost and shown in the GIF below.
At this point, after writing less than 40 lines of code, we have a functioning REST API for spam detection. Check out the full Fast API app code below.
https://gist.github.com/AmolMavuduru/23bdab9b935d8bd344ff0f972c7141ff
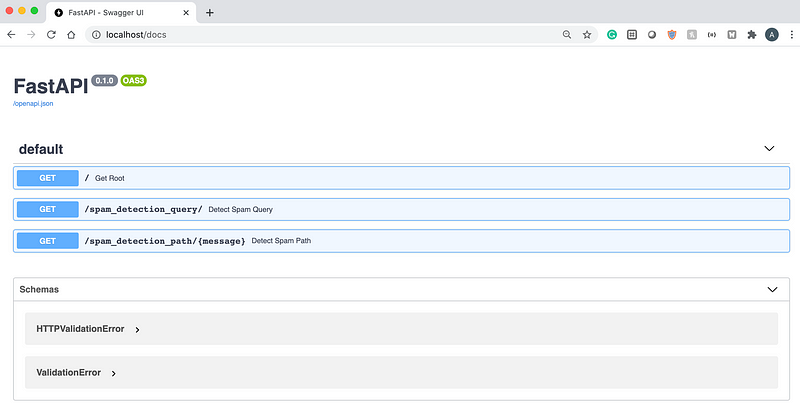
Automatically Generated Documentation
If you navigate to http://127.0.0.1:8000/docs you will find the documentation page for the FastAPI app.
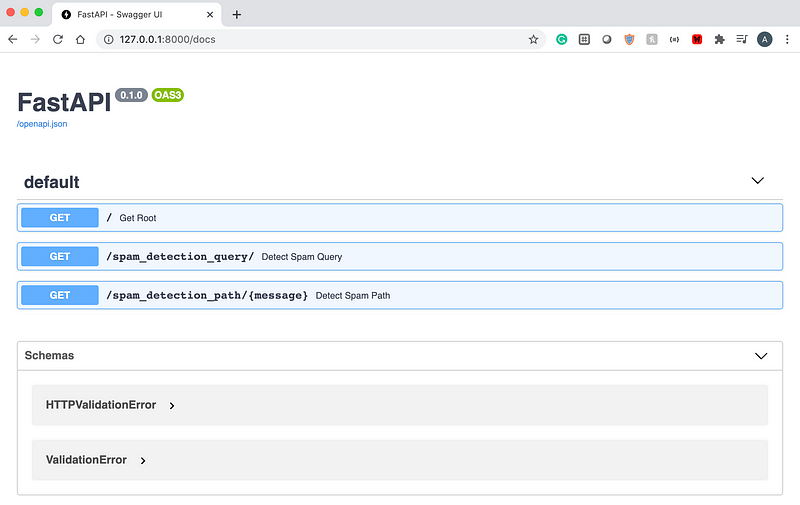
We can also use this documentation page to test each of the GET commands as demonstrated in the GIF below.
The great part about Fast API is that this documentation page was generated automatically. We did not have to write any code or invest hours of time into building it.
Deploying the App on Docker
Now that we have a working API, we can easily deploy it anywhere as a Docker container. If you aren’t familiar with Docker, it is basically a tool that lets you package and run applications in isolated environments called containers.
To run the API as a Docker container, you need to first create a directory called app with all of the code files and a Dockerfile in the parent directory with instructions for running the FastAPI app. To do this, open a text file named “Dockerfile” and add the following lines to it.
FROM tiangolo/uvicorn-gunicorn-fastapi:python3.7
COPY ./app /app
WORKDIR /app
RUN pip install sklearn joblib
Your directory structure should look something like this along with a few extra files from training the spam detection model:
.
├── app
│ └── main.py
└── Dockerfile
The Dockerfile above performs the following tasks:
- Pulls the FastAPI docker image.
- Copies the contents of the app directory to the image.
- Makes the app directory the working directory.
- Installs necessary dependencies such as Scikit-learn and Joblib.
After creating this file, save it and build the Docker image with the following command.
docker build -t myimage .
Once the image has been built, you can run the Docker container with the following command.
docker run -d --name mycontainer -p 80:80 myimage
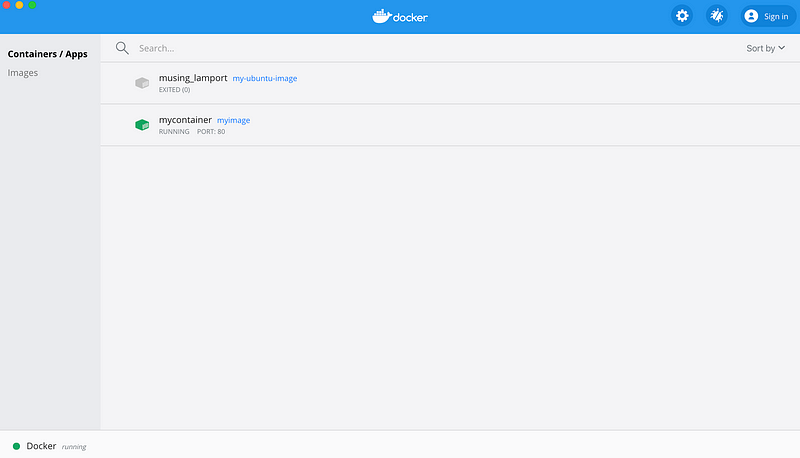
Now, you should have a Docker container running on your local machine. If you open your Docker dashboard, you should be able to see the container running as pictured in the screenshot below.
If you hover over the container, you should see a button that says “OPEN IN BROWSER” as shown below.

Click on this button to view the container running in your browser. You should see the output of running the GET command from the root URL below.
We can even test this API by going to the documentation page at localhost/docs.
As demonstrated in the screenshot below, we can easily tell that the API is working as expected, but this time it is running on a Docker container.
Now that the API is running in a Docker container, we can deploy it on a wide range of platforms. If you’re interested in taking this project a step further, check out some of the links below if you want to deploy this API on a cloud platform.
How to Deploy Docker Containers on AWS
Deploy Docker Containers on Azure
Deploy Docker Containers on Google Cloud Platform
Summary
In this article, I demonstrated how you can use FastAPI along with Docker to quickly deploy a spam detection model. FastAPI is a lightweight and fast framework that data scientists can use to create APIs for machine learning models that can easily be integrated into larger applications.
As usual, you can find the code for this article on GitHub.
Join My Mailing List
Do you want to get better at data science and machine learning? Do you want to stay up to date with the latest libraries, developments, and research in the data science and machine learning community?
Join my mailing list to get updates on my data science content. You’ll also get my free Step-By-Step Guide to Solving Machine Learning Problems when you sign up!
Sources
- S. Ramirez, FastAPI Documentation, (2021).